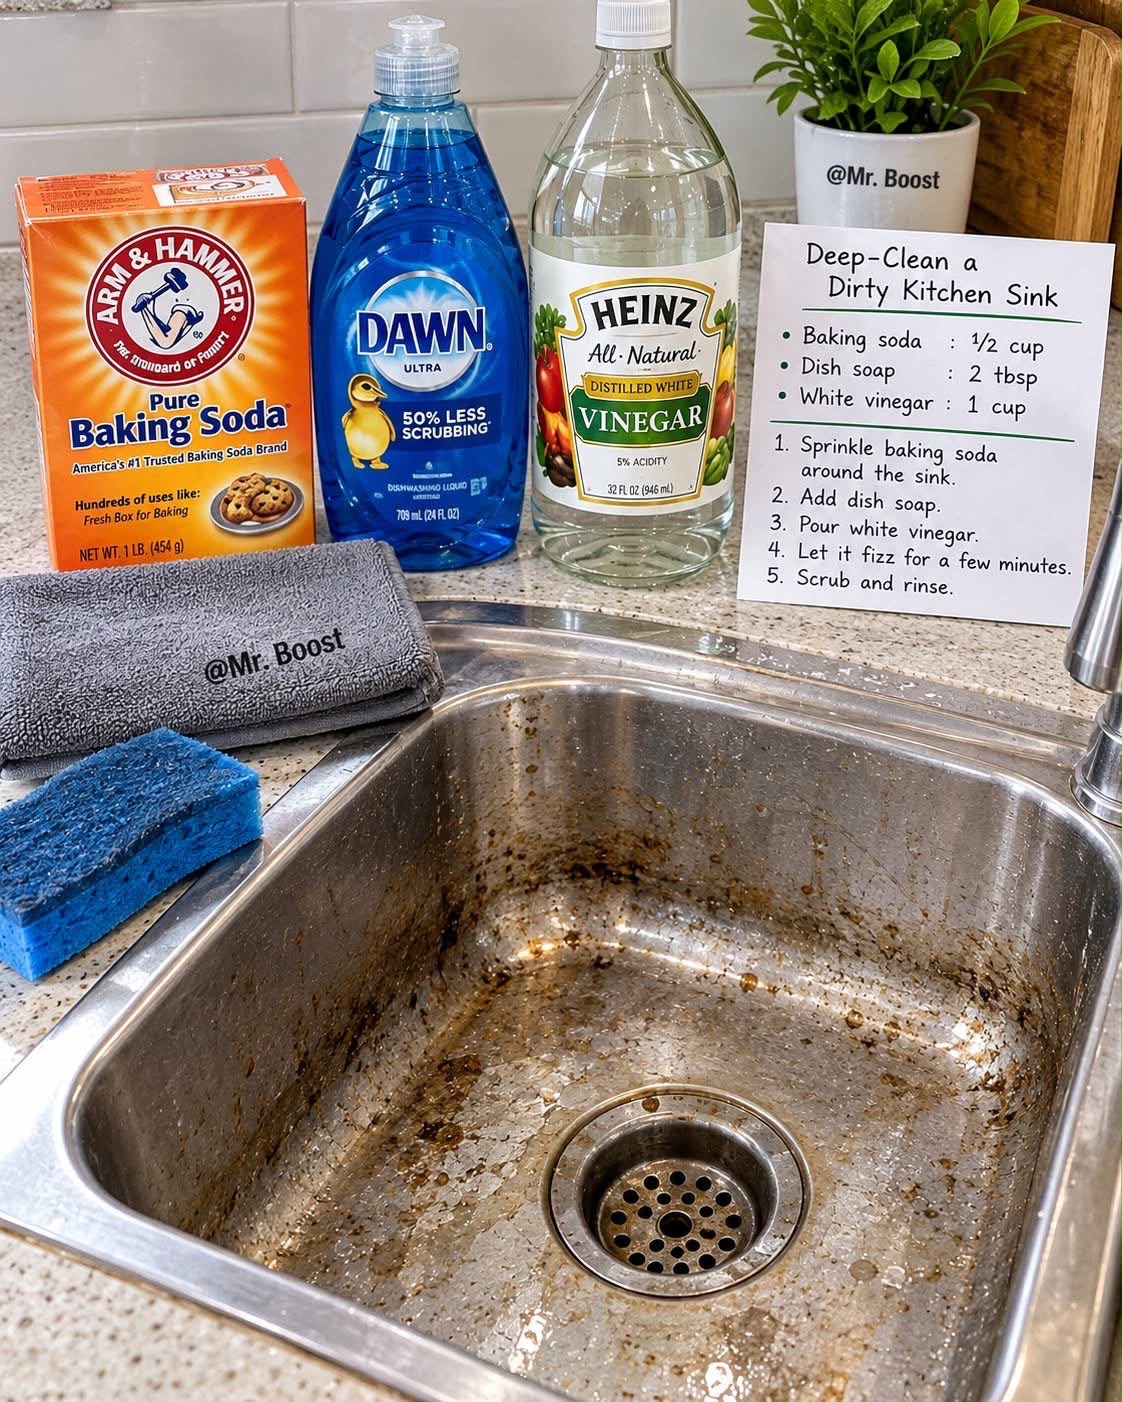
How to Deep-Clean a Dirty Kitchen Sink Naturally: A Simple Step-by-Step Guide
A dirty kitchen sink can quickly become one of the most overlooked areas in your home. From food residue and grease to water stains and unpleasant odors, everyday use can leave your sink looking dull and unclean. Even when you rinse it regularly, grime can build up around the drain, edges, and corners.
The good news is that you don’t always need expensive cleaning products to refresh your kitchen sink. With a few simple household ingredients, you can create an easy cleaning routine that helps remove everyday dirt, loosen grime, and leave your sink looking cleaner.
In this guide, you’ll learn how to deep-clean a dirty kitchen sink using baking soda, dish soap, and white vinegar, along with practical tips for maintaining a fresh and tidy sink.
Why You Should Deep-Clean Your Kitchen Sink
Your kitchen sink is used many times throughout the day. You wash dishes, rinse vegetables, clean cooking utensils, and sometimes leave food particles behind. Over time, this can create a layer of grease, residue, and stains.
Regular cleaning helps remove visible dirt, but occasional deep cleaning can help you reach areas that are easy to miss.
Here are some common reasons to give your sink extra attention:
- Grease buildup: Oils and food residue can stick to the sink surface.
- Water spots: Minerals in water can leave marks, especially on stainless steel.
- Food residue: Small particles can collect around the drain and edges.
- Unpleasant odors: Residue in the sink or drain area may contribute to bad smells.
- Dull appearance: Regular use can make the surface look less shiny.
A simple cleaning routine can help your sink stay fresh and make your kitchen feel more organized.
Deep-Clean a Dirty Kitchen Sink: Full Method
Ingredients and Supplies
Before you begin, gather the following items:
- ½ cup baking soda
- 2 tablespoons dish soap
- 1 cup white vinegar
- A soft sponge or suitable scrub brush
- Warm water
- A microfiber cloth
- Optional: Rubber cleaning gloves
These ingredients are commonly used for household cleaning. Baking soda provides mild abrasive action, dish soap helps lift grease, and vinegar can help dissolve certain mineral deposits. They work best when used appropriately for the sink’s surface.
Important: Baking soda and vinegar react with each other and produce fizzing, but mixing them largely neutralizes their acid-base properties. The bubbling does not mean the mixture is a powerful disinfectant or that it will remove every stain. Dish soap, gentle scrubbing, and thorough rinsing are important parts of the process.
Step 1 — Sprinkle Baking Soda Around the Sink
Start by removing dishes, sponges, and any objects from your kitchen sink. Rinse away loose food particles with warm water.
Sprinkle approximately ½ cup of baking soda evenly across the sink surface, focusing on areas where dirt and grime have accumulated.
Make sure to cover the bottom of the sink and pay attention to the corners and areas around the drain.
Baking soda has a mild abrasive texture, which can help loosen everyday residue when you gently scrub it with a sponge.
Cleaning tip: If your sink is only slightly dirty, you may need less baking soda. Adjust the amount according to the size of your sink and the amount of residue present.
Step 2 — Add Dish Soap
Next, add approximately 2 tablespoons of dish soap over the baking soda.
Dish soap helps break down grease and oily food residue, making it easier to remove dirt from the sink’s surface.
Spread the soap around the sink using a soft sponge or your hand while wearing gloves. Focus on areas where grease is visible, such as around the drain and the sides of the basin.
You don’t need to use excessive amounts of dish soap. A moderate amount is usually sufficient for everyday grease and grime.
Helpful tip: For stubborn grease, allow the dish soap to sit on the affected area for a few minutes before scrubbing.
Step 3 — Slowly Pour White Vinegar
Slowly pour approximately 1 cup of white vinegar over the baking soda and dish soap.
As the vinegar comes into contact with the baking soda, the mixture will begin to fizz. This reaction is caused by the acid in vinegar reacting with the baking soda.
Pour slowly to help prevent excessive bubbling from spreading over the sink.
Vinegar is acidic and may help dissolve some hard-water mineral deposits. However, it is not suitable for every sink material, and it should not be treated as a universal cleaner.
Safety note: Never mix vinegar with chlorine bleach or products containing bleach. This can release dangerous chlorine gas. Avoid combining vinegar with other unknown cleaning chemicals.
Step 4 — Let the Mixture Fizz and Sit Briefly
Allow the mixture to fizz briefly and sit for a few minutes.
The bubbling reaction is mainly a chemical reaction between baking soda and vinegar, rather than a deep-cleaning action that continues indefinitely. The mixture may help loosen some residue, but the actual cleaning will depend on the soap, scrubbing, and the type of dirt on your sink.
Avoid letting acidic vinegar sit for a long time on surfaces that may be sensitive to acids.
For a stainless steel sink, a short contact time followed by thorough rinsing is a more cautious approach. If you have a sink made from marble, natural stone, or another specialty material, check the manufacturer’s cleaning recommendations before using vinegar.
Step 5 — Scrub Away Dirt and Grime
Now it’s time to scrub the sink.
Use a soft sponge or a brush that is appropriate for your sink’s material. Work in gentle circular motions, paying extra attention to areas where stains, grease, and food residue have collected.
Concentrate on:
- The bottom of the sink
- Corners and edges
- Around the drain
- Areas with visible grease
- Faucet surroundings, using a suitable cleaning method
Avoid aggressive scrubbing with steel wool or harsh abrasive pads, particularly on stainless steel, because they can scratch the surface.
If you encounter stubborn residue, apply a little dish soap to a damp sponge and work on the area gently. Some stains may require a different treatment depending on their cause.
Pro tip: For brushed stainless steel, scrub in the direction of the grain rather than using random circular motions. This can help reduce the appearance of visible scratches.
Step 6 — Rinse the Sink Thoroughly
Once you’ve finished scrubbing, rinse the sink thoroughly with clean water.
Make sure to remove all remaining baking soda, dish soap, loosened dirt, and vinegar residue. Pay attention to the corners and around the drain.
Leaving cleaning product residue on the sink may cause a dull appearance or leave a film on the surface.
Use warm water to help rinse away soap and grease, provided the water temperature is safe for your sink and plumbing.
Step 7 — Dry and Polish With a Microfiber Cloth
After rinsing, use a clean microfiber cloth to dry the entire sink.
Drying helps reduce water spots and prevents standing water from remaining on the surface. This is particularly useful if you live in an area with hard water, where mineral deposits can become more noticeable.
Wipe the bottom, sides, edges, and around the faucet.
When you’re finished, your sink should feel clean and look refreshed.
For stainless steel, you can optionally use a cleaner specifically labeled as safe for stainless steel if you want additional shine. Always follow the product instructions and avoid mixing cleaning products.
How to Remove Common Kitchen Sink Problems
Different types of dirt require different cleaning methods. The baking soda and dish soap routine may help with everyday grime, but not every stain will respond in the same way.
1. Greasy Sink
Grease is best addressed with a suitable dishwashing detergent and warm water.
Method:
- Remove food particles from the sink.
- Apply a small amount of dish soap to a damp sponge.
- Gently scrub greasy areas.
- Rinse thoroughly with warm water.
- Dry the sink with a microfiber cloth.
For heavy grease, repeat the cleaning process rather than using increasingly harsh chemicals.
2. Water Spots
Water spots are often caused by minerals left behind when water evaporates.
A diluted vinegar solution may help remove mineral deposits from some compatible surfaces. However, vinegar should be avoided on acid-sensitive materials, including many natural stone surfaces.
For stainless steel, follow the sink manufacturer’s recommendations and rinse the surface thoroughly after using any acidic cleaner.
Drying your sink after use is one of the easiest ways to reduce new water spots.
3. Food Residue Around the Drain
Food particles can collect around the drain opening and create unpleasant odors.
To clean the area:
- Remove visible food debris.
- Use dish soap and a soft brush or sponge.
- Gently clean around the drain opening.
- Rinse thoroughly.
- Clean the drain strainer separately if it is removable and designed for cleaning.
Important: Cleaning the visible sink surface does not necessarily clean the inside of your plumbing or remove a blockage. If your drain is slow or clogged, use a method suitable for your plumbing system.
4. Dull Stainless Steel
A stainless steel sink can lose its shine due to water spots, grease, and residue.
Start with dish soap and a soft sponge. Rinse thoroughly and dry with a microfiber cloth.
Avoid steel wool and abrasive cleaning products that can scratch the surface. If you want to polish the sink, choose a product designed for stainless steel and follow the manufacturer’s instructions.
Mistakes to Avoid When Cleaning Your Kitchen Sink
A clean sink is important, but using the wrong cleaning products can damage the surface or create safety risks.
Avoid Mixing Vinegar With Bleach
Never mix white vinegar with chlorine bleach or bleach-containing cleaners. The combination can release toxic chlorine gas.
If you have already used a cleaning product, rinse the area thoroughly and follow the product label’s instructions before applying another cleaner.
Don’t Use Harsh Scrubbing Tools
Steel wool and rough abrasive pads can scratch certain sink surfaces, including stainless steel.
Choose a soft sponge or a brush that is appropriate for your sink’s material.
Don’t Leave Vinegar on Sensitive Materials
Vinegar is acidic and may damage natural stone, marble, and other acid-sensitive surfaces. Check the manufacturer’s guidance before using it.
Don’t Assume Fizzing Means Disinfection
Baking soda and vinegar fizz when mixed, but the reaction does not prove that the sink has been disinfected.
If disinfection is necessary, use a suitable product labeled for the specific surface and follow its instructions.
Don’t Forget to Rinse
Cleaning products left behind can create residue or damage certain surfaces over time. Always rinse according to the cleaner’s directions.
How Often Should You Deep-Clean Your Kitchen Sink?
The ideal cleaning schedule depends on how frequently your sink is used, the type of sink material, and how quickly dirt accumulates.
A simple routine can help keep your kitchen sink in good condition.
Daily cleaning
Rinse away food debris, clean visible residue, and dry the sink when possible.
Several times per week
Use dish soap and a suitable sponge to remove grease and buildup as needed.
Weekly deep clean
Give the sink, drain strainer, edges, and faucet area a more thorough cleaning.
As needed
Address stains, mineral deposits, and odors using methods appropriate for your sink material.
Natural Cleaning Tips for a Fresher Kitchen
Keeping your kitchen sink clean is easier when you build a few simple habits into your daily routine.
Rinse Food Debris Immediately
Try not to leave food scraps sitting in the sink for long periods. Remove solid residue and rinse the basin after preparing meals.
Keep the Sink Dry
After washing dishes, wipe away excess water. This can help reduce water spots and prevent moisture from lingering on the surface.
Clean the Faucet Area
Water and soap residue can accumulate around the base of the faucet. Use a soft cloth and a suitable cleaner for the faucet’s finish.
Wash Your Cleaning Sponge
Sponges can collect food residue and moisture. Clean them appropriately and replace them regularly when they become worn or develop an odor.
Use the Right Product for Your Sink
Not every sink material responds well to the same cleaner. Stainless steel, porcelain, ceramic, composite, and natural stone may have different care requirements.
Always prioritize the manufacturer’s recommendations.
Frequently Asked Questions
Can baking soda and vinegar clean a dirty kitchen sink?
They may help loosen some residue and mineral deposits, depending on the surface and type of dirt. Baking soda provides mild abrasive action, while vinegar is acidic. However, their reaction neutralizes much of their cleaning chemistry, so combining them is not necessarily more effective than using appropriate cleaners separately.
Dish soap and gentle scrubbing are often more useful for removing grease.
How long should I leave baking soda and vinegar in the sink?
A brief contact time is sufficient for this routine. There is no need to leave the mixture for a long period. Rinse thoroughly afterward, and avoid vinegar on acid-sensitive materials.
Can I use this method on a stainless steel sink?
Stainless steel can generally be cleaned with mild dish soap and a soft sponge. Baking soda may be suitable for some stainless steel finishes, but vinegar should be used cautiously and rinsed thoroughly. Check the manufacturer’s care instructions, and avoid abrasive tools that could scratch the surface.
Will this method remove every stain?
No. The results depend on the type of stain, how long it has been present, and the material of the sink. Hard-water deposits, rust, discoloration, and scratches may require specialized cleaning or professional treatment.
Can I use this mixture to unclog my sink drain?
This cleaning routine is intended for surface cleaning, not for reliably clearing clogged plumbing. Baking soda and vinegar are not a dependable substitute for an appropriate drain-clearing method. If your drain is blocked, use a suitable approach for your plumbing system or contact a plumber.
Final Thoughts
A clean kitchen sink can make your entire kitchen feel fresher and more organized. With regular rinsing, dish soap, gentle scrubbing, and proper drying, you can remove everyday grease and residue without relying on complicated cleaning routines.
The baking soda and vinegar method can be a useful household cleaning idea when used with realistic expectations and appropriate surface precautions. Remember that the key to a clean sink is consistent maintenance, the right cleaning products, and gentle care.
Try this simple cleaning routine the next time your kitchen sink needs extra attention, and make it part of your regular home-cleaning schedule.
Have you tried cleaning your kitchen sink with baking soda and dish soap? Share your favorite cleaning tip in the comments!